Terms Of Use
Please feel free to use my snags...AS IS. DO NOT in any way alter them( this includes putting your own or someone else's names on them), tear apart or claim as your own!!
Background & Header made by me, Natalie, on Sept. 11, 2012. Kit used Calming of Fall by Karra. Powered by Blogger.
Labels
- Alex Prihodko (25)
- Amy Marie (14)
- Anna Marine (5)
- Barbara Jensen (3)
- Beach (1)
- Candy Cats (1)
- Cluster Frame (18)
- Cris Ortega (1)
- CT Tag (46)
- Drea's Creations (1)
- Elias Chatzoudis (2)
- Ellie Milk (9)
- Fall/Autumn (10)
- Freebie (24)
- Halloween (4)
- Heather's Devine Dezigns (11)
- Jackie'sJewels (20)
- Karra's Kreative Korner (7)
- Keith Garvey (5)
- Krissy's Scraps and Imaging (1)
- Little Red Riding Hood (1)
- Nocturne (1)
- Pimpin PSPers Warehouse (3)
- Pinup Toons (3)
- PTU (31)
- Rachel Anderson (1)
- Snags (50)
- Spring (2)
- St.Patrick's Day (1)
- Steampunk (1)
- Summer (1)
- Suzanne Woolcott (1)
- tutorials (2)
- Valentine's Day (7)
- Verymany (9)
- Winter (1)
- Word Art (1)
Followers
Message Me!
Saturday, December 5, 2009
Thursday, December 3, 2009
I have a new layout, and I have added a blinkie, so grab it if you want. Hopefully I will be able to get a new tut out in the next few days since I am off of work. Working retail this time of year, to say the least, is a little bit CRAZY!!! Hugs to you all!
Sunday, November 8, 2009
I have made a couple of new tags, not sure if I'm gonna tut them or not. If you like what you see and want one, or think I should tut them, leave a message! Thanks!


Sunday, November 1, 2009

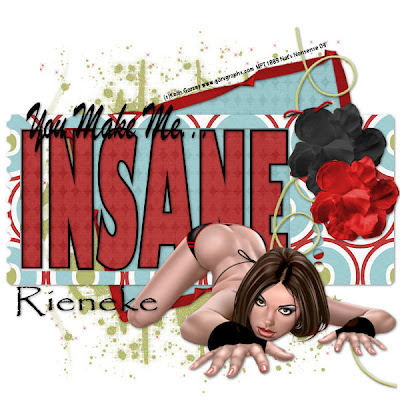
INSANE
This Design is of my own creation, any similarities to any other tuts is coincidental. This Tutorial was written by me, Natalie, on November 1st 2009. This tutorial was made using PSP X2 but can be used in other versions as well.
Supplies Needed:
A working knowledge of PSP
Scrapkit-INSANE by Rieneke, you can purchase it HERE Thanks for the use of your kit hun!
Tube and images of your choice. I am using the awesome artwork of Keith Garvey. Please DO NOT use the same tube unless you have a licence to do so. You may purchase a licence HERE
Font and mask of your choosing.
Ready to PSP? Let’s Start!
Start with a canvas 600x600. Flood fill white. Open frame 4 from the scrapkit. Copy and Paste into your canvas. Resize if needed. Open frame 2. Copy and paste and put behind frame 4. Using your magic wand click inside frame 2. Selections-Expand-Modify-5. Copy and paste Paper . Selections- invert- and then hit delete on your keyboard. You should move it behind frame 2. Add drop shadow of choice on the frames. Next, pick a thick font of your choice, and write the words INSANE. Stretch it to fit inside the first frame. See my tag for reference. Click your magic wand tool again, and click inside the I. Hold down the shift button and click inside each of the letters. Selections-modify-expand-2. Copy and paste paper 2. Selections-invert, and hit delete. Move behind the letters. Add drop shadow to your liking on the letters. Add your tube, and drop shadow, then add elements of your choosing . You may use the same ones I have, see tag for placement, or go out on a limb and use your own! Add mask of choice. Add name and copyright. Now you are done! Thanks for trying my tut!
Sunday, October 4, 2009

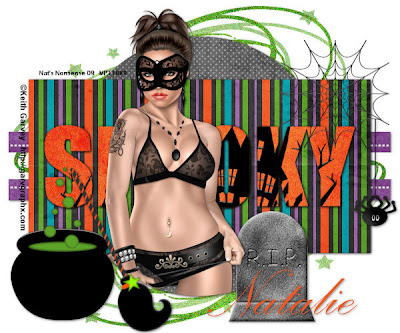
SPOOKY
This Design is of my own creation, any similarities to any other tuts is coincidental. This Tutorial was written by me, Natalie, on October 4th 2009. This tutorial was made using PSP X2 but can be used in other versions as well.
Here is what you will need:
You need to have a working knowledge of PSP.
Scrapkit-Witchy Woo Ghost Train Freebie by Twinky you can find that HERE
Tag Template from Kristen of Toxic Desirez Template #93 you can find that HERE
Tube and images of your choice. I am using the spectacular artwork of Keith Garvey. Please do not use the same tube unless you have a licence to do so. You can purchase a licence HERE
Font and Mask of your choosing.
Ready to PSP? Let’s Do It!
Open Template 93. Duplicate and close out original. Resize your canvas to 600x600. Open a paper of your choice. I used Paper 3. Make sure your big rectangle layer is active on your template layers.
Selections-Select All-Float-Defloat
Copy and paste paper as a new raster layer
Selections-Invert and hit delete. On your layer pallet, delete the big grey rectangle. Add drop shadow of your choice.
Open Paper 8 (orange). Make sure the wordart layer is active. Selections-Select All-Float-Defloat. Copy and paste paper as new raster layer. Selections-Invert and hit delete. Again, delete the original layer of wordart. At this point I added noise. You can add it or not. To add noise go to Adjust-Add/Remove Noise-Add noise Uniform setting and 21%. I added the Haunted House scene from the scrapkit following the same steps as above.
I deleted the face layer, as I didn’t want to use them. You can do the same or use them if you would like.
Open Paper 6 (Black). Make sure your circle layer is active. Selections-Select All-Float-Defloat. Copy and paste paper as a new raster layer. Delete original circle layer. Add drop shadow of your choice. At this point I left the tone layer alone. You can do with it what you want.
Repeat these steps for the rest of the layers on the template.
Open the tube of your choice. Copy and past as new raster layer. Position it to your liking. When you have it where you want it, duplicate the layer. Add a drop shadow to BOTH layers. Activate your circle layer. Selections-Select All-Float-Defloat. Now, activate the BOTTOM tube layer. Selections-Invert and hit delete. Activate the TOP tube layer. Go to your selection tool –Freehand Selection. Draw around the bottom of the tube, making sure you go partway into the circle. Then hit delete.
Add elements to your liking or see mine for placement.
Add Name, and copyright information.
All Done!! Thanks for trying my tut!
Saturday, October 3, 2009
Wednesday, September 30, 2009
Subscribe to:
Comments
(Atom)


